Single Tenancy
You will need a special signed URL that XAPP will provide to you, this will be used to authenticate your access to the
Single tenancy allows you to host all of OC Studio on your AWS account. Typically this is necessary when you have sensitive information that you work with that needs to have restricted access.
Deploying
At a high level, for deployment we will provide you with an authentication method and command line script that you will use to then deploy a OC Studio instance to your AWS account. This script will automatically deploy all the necessary services, application code and the necessary IAM roles them to communicate with each other. You will then have a CMS API, a GraphQL API and a Studio web application URL.
From there you can start to build out your application in Studio and point your assistant application to use the new runtime API.
Setup AWS
-
Create an AWS account in which to deploy Studio.
-
Create an IAM user with administrator privileges that allows this script to assume. The policy attached to this user is also the policy that CloudFormation will use to deploy the client and API
-
Create a programmatic access and secret access key for the IAM user and save these credentials as a profile in the
~/.aws/credentialsfile. -
Create two S3 buckets. One bucket will be used to deploy the client to and the other will be used to deploy the API code to. These buckets must be in the same region that the Studio is to be deployed to.
- Use names like
{your-org}-studio-client-{env}&{your-org}-studio-api-{env}since S3 buckets must be globally unique.
- Use names like
-
Set up a CloudFront distribution to the client S3 bucket. The set the default setting except for:
- Set default root object to
/index.html - Set up the following Origin Access
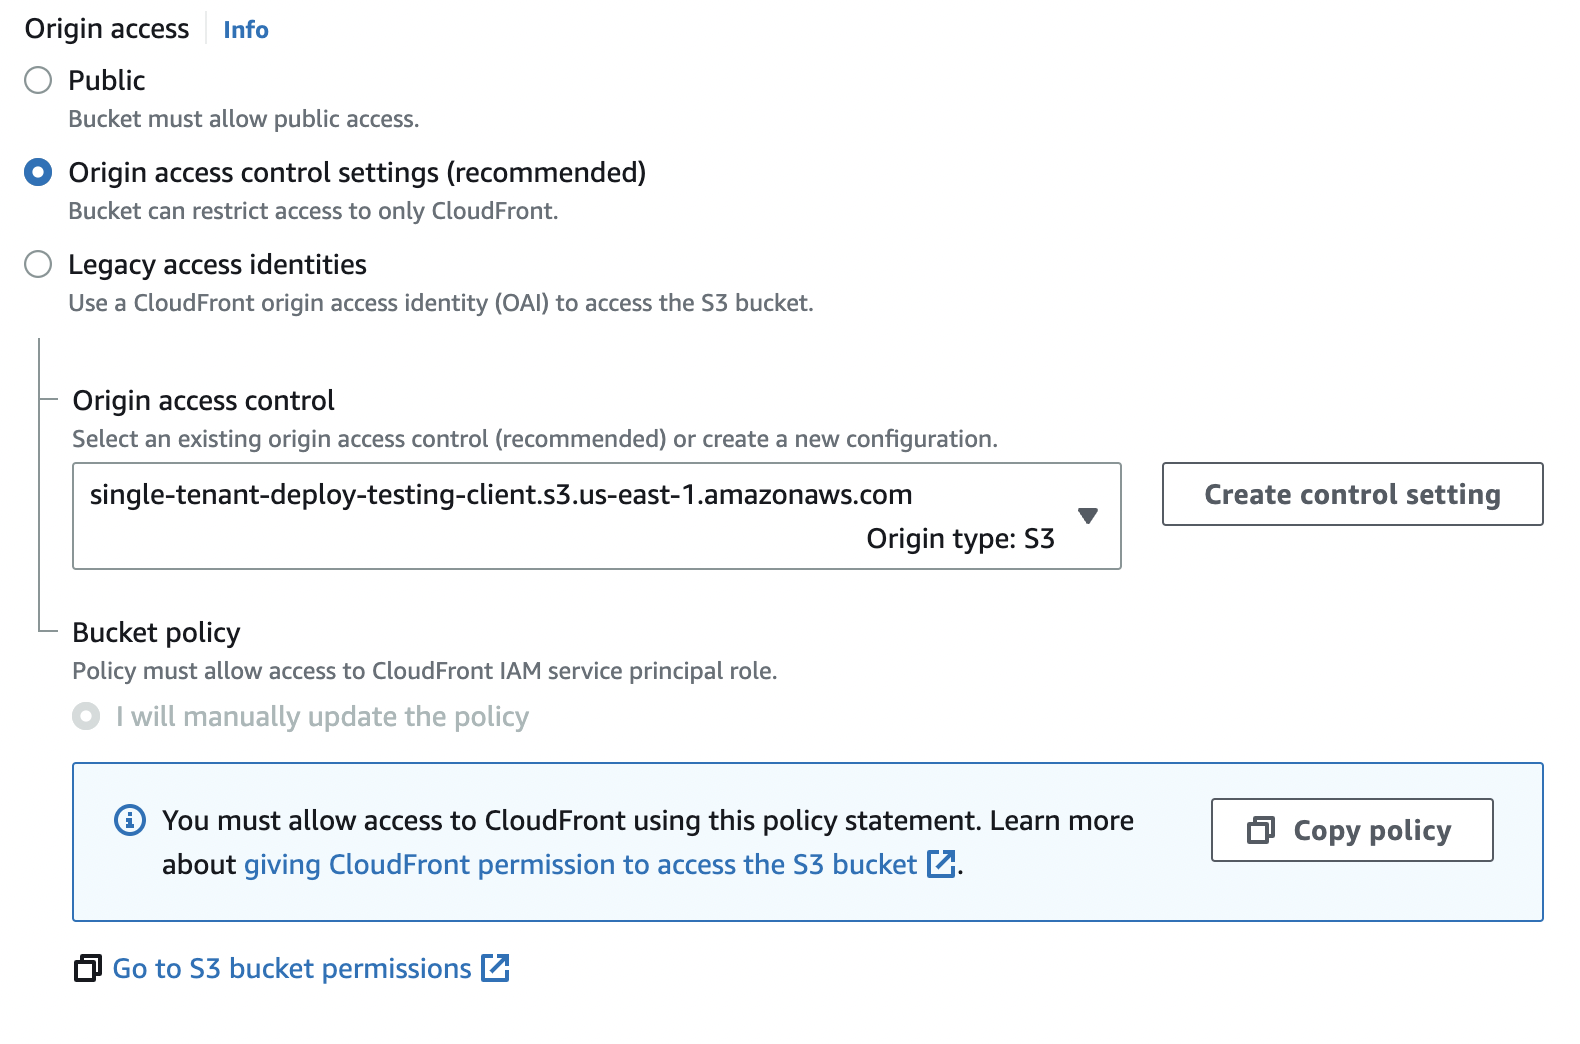
-
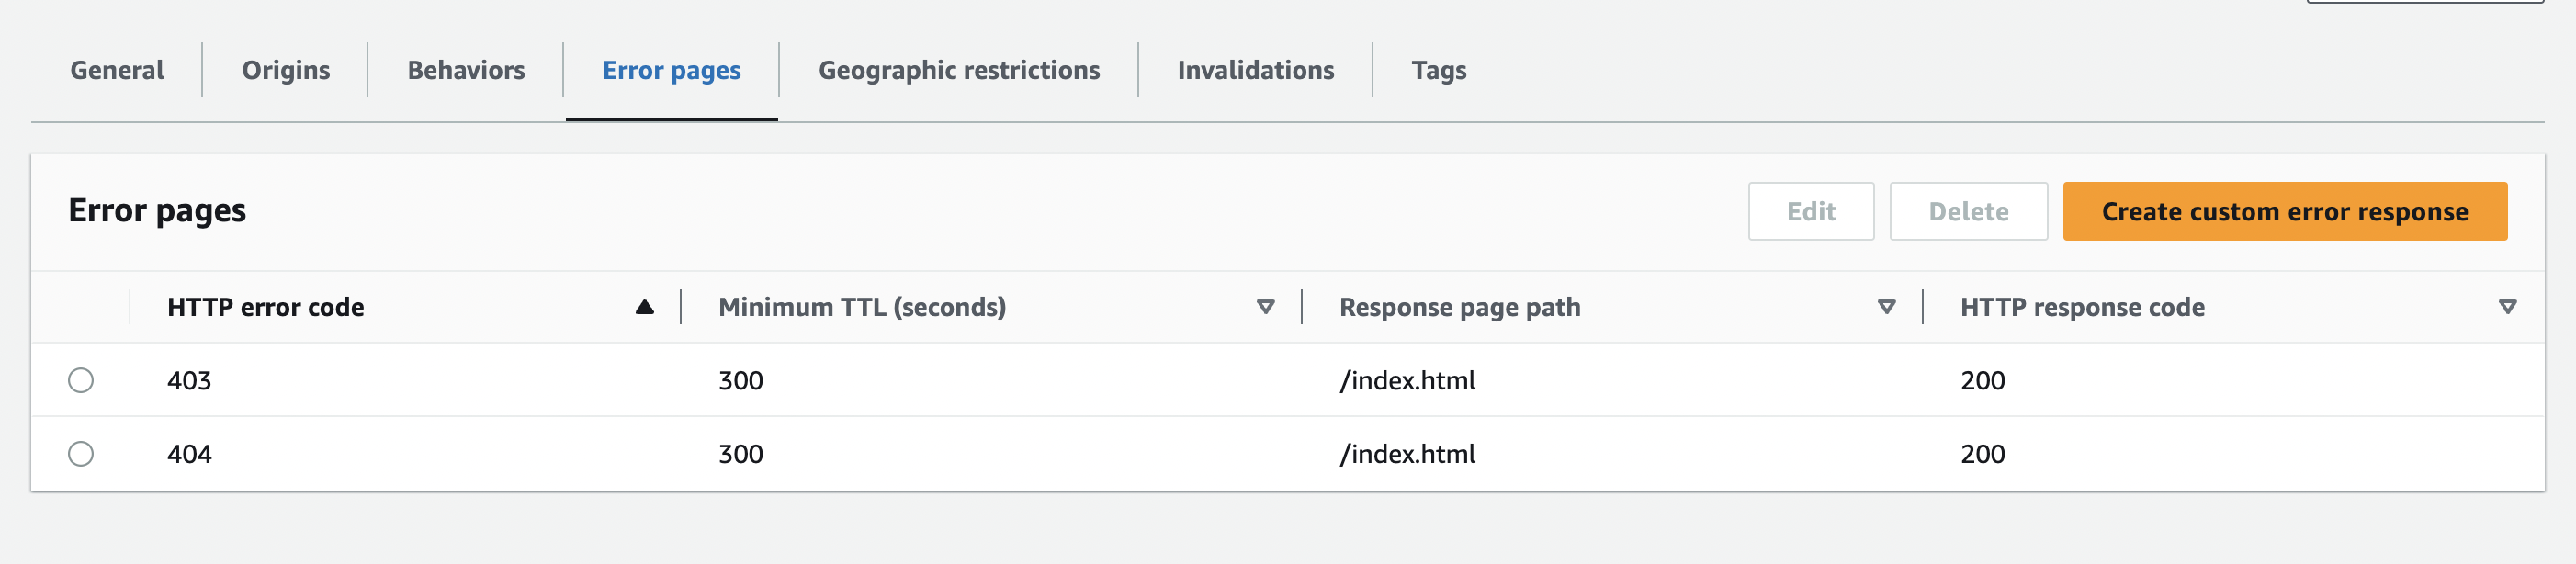
Create two error pages that point to /index.html, Studio is a single page web application all paths need to redirect back to root.
- Error code 403 should change to a 200, return /index.html
- Error code 404 should keep at 404, return /index.html
-
Update your S3 bucket permissions, replacing variables for those in your environment.
 {
     "Version": "2008-10-17",
     "Statement": [
         {
             "Sid": "AllowCloudFrontServicePrincipal",
             "Effect": "Allow",
             "Principal": {
                 "Service": "cloudfront.amazonaws.com"
             },
             "Action": "s3:GetObject",
             "Resource": "arn:aws:s3:::{{BUCKET-NAME}}/*",
             "Condition": {
                 "StringEquals": {
                     "AWS:SourceArn": "arn:aws:cloudfront::{{ACCOUNT-ID}}:distribution/{{CLOUDFRONT-DISTRIBUTION-ID}}"
                 }
             }
         }
     ]
} - Set default root object to
Setup Deployment Script
- Install the script
Either globally
npm install -g @xapp/studio-deploy
or as a devDependency in your package.json
{
  "devDependencies": {
    "@xapp/studio-deploy": "0.0.23"
  },
  "scripts": {
    "studio-help": "studio-deploy --help",
    "studio-list-versions": "studio-deploy list",
    "studio-deploy-client": "studio-deploy deploy-client",
    "studio-deploy-api": "studio-deploy deploy-api",
    "studio-configure": "studio-deploy deploy-config"
  }
}
-
Set your AWS_REGION, only us-east-1 is supported at this time.
-
Set your AWS_PROFILE
export AWS_PROFILE=<profile>
-
Add the following environment variables to your current terminal or environment
STUDIO_CF_DISTRO_DOMAINThis is the domain that the cloudfront distribution created earlier has.STUDIO_CLIENT_S3_BUCKETThis is the name of the bucket that was created to store the client.STUDIO_API_S3_BUCKETThis is the name of the bucket that was created to store the api client.STUDIO_COGNITO_DOMAINThis will be the domain of the Amazon Cognito pool, it will need to be globally unique within AWS.- We recommend something like
{your_org}-studio-{env}, thusxapp-studio-prodto avoid collisions - You can use Cognito to hook into another federated identity system your organization may have.
- We recommend something like
-
Add the signed URL to your environment to authorize your deployment
STUDIO_SIGNED_URLA url in the format"https://single-tenant.xapp.ai?Policy=<token>"provided by XAPP.- Note: You will need to surround it in
"
Deploy OC Studio
You will need to deploy the client and API seperately with the following commands. This allows you to update them independently (client tends to have more releases than API).
Deploying Client
studio-deploy deploy-client [ver]
The [ver] is optional, by default it will deploy the latest version.
A successful release will upload all the fils to your S3 bucket and look like the following:
With a successful deployment ending with...
....

Uploaded "vendors~organizations~ee8c9296.bcb56d89.js.LICENSE.txt"
Uploading "vendors~organizations~ee8c9296.bcb56d89.js.map"
Uploaded "vendors~organizations~ee8c9296.bcb56d89.js.map"
Uploading "vendors~organizations~f571ecdd.7b0e1102.js"
Uploaded "vendors~organizations~f571ecdd.7b0e1102.js"
Uploading "vendors~organizations~f571ecdd.7b0e1102.js.map"
Uploaded "vendors~organizations~f571ecdd.7b0e1102.js.map"
Client has been released.


Done in 71.86s.
Deploying API
The API script will first deploy the necessary deployment assets that will be used by Cloudformation to the S3 bucket you configured earlier.
studio-deploy deploy-api [ver]
The [ver] is optional, by default it will deploy the latest version.
The script will first
...
Uploading "1.73.2-0.22.79/cloudformation-template-update-stack.json"
Uploaded "1.73.2-0.22.79/cloudformation-template-update-stack.json"
Starting Cloudformation upload
Creating stack...
.
.
At this point, the script will trigger a Cloudformation stack creation. You will continue to see many . in your console as progress is being made. You can go to the AWS Cloudformation console and follow along there, the name of the stack is studio-deploy.
Once it is complete, you will see this output:
Checking if index exists for alias "stentor_audio_events".
Alias an index "stentor_audio_events" exist.
Checking if index exists for alias "stentor_error_events".
Alias an index "stentor_error_events" exist.
Setting up template suggestions...
Checking if index exists for alias "suggestions".
Alias an index "suggestions" does not exist.  Creating...
Setting up template usage_events...
Checking if index exists for alias "usage_events".
Alias an index "usage_events" does not exist.  Creating...
Setting up pipelines...
Setting up pipeline asIsPipeline...
Setting up pipeline faqs_pipeline...
Setting up pipeline suggestions_pipeline...
.


Done in 1902.67s.
Configure a key for your tokens
Changing your keys later will invalidate all your tokens.
In order to create tokens, that will allow a secure connection between the runtime and your Studio instance, you will need to generate a secure key.
-
On Mac, Linux or WSL2 run the command
ssh-keygen -f cms_key.key -b 4096 -t rsa -m pkcs8. If this is not available, then use the preferred method to generate RSA private and public key pairs. Do not include any passphrases. -
Run the command
ssh-keygen -f cms_key.key.pub -b 4096 -e -t rsa -m pkcs8. This should convert the public key in to the proper format which should look similar to this:
-----BEGIN PUBLIC KEY-----
ARandomBunchOfGibberish
-----END PUBLIC KEY-----
- Run the command
cat cms_key.keyto display the private key which should be in the format like so:
-----BEGIN PRIVATE KEY-----
ARandomBunchOfGibberish
-----END PRIVATE KEY-----
-
Go to the AWS Console. Go to
Systems Manager, and navigate to theParameter Store. -
Click
Create Parameter. Name the new parameterstudio-cms-public-dev. ClickSecureStringundertype. Copy and paste the public key in to theValuesection. Click theCreate Parameterbutton. -
Click
Create Parameterand this time name the parameterstudio-cms-private-dev. ClickSecureStringundertype. Copy and paste the private key in to theValuesection. Click theCreate Parameterbutton.
That is it! You can now generate tokens based on this secure key.
Configuring Client
After the assets have been deployed, you can generate and upload a configuration file for the client by running:
studio-deploy deploy-config
This script should only take a few seconds and the output will look like the following:
Checking if api has been deployed....
Looking for api URL.
Uploading configuration to S3...
{
  "apiUrl": "https://xxxx.execute-api.us-east-1.amazonaws.com/dev",
  "wsUrl": "https://xxxx.execute-api.us-east-1.amazonaws.com/dev",
  "searchUrl": "https://xxxx.cloudfront.net",
  "documentationUrl": "https://documentation.xapp.ai",
  "feedbackEmail": "feedback@xapp.ai",
  "supportEmail": "support@xapp.ai",
  "auth": {
    "provider": "cognito",
    "audience": "https://studio.xapp.ai",
    "clientId": "7nbshlqvnqp5m6qe93a8ehietf",
    "domain": "studio-single-tenant-xxxx.auth.us-east-1.amazoncognito.com"
  }
}
config.js has been uploaded.


Done in 2.14s
It will generate a file and upload it to the client S3 bucket at /config.js and looks like this:
window["xaStudioConfig"] = {
  apiUrl: "",
  wsUrl: "",
  widgetUrl: "",
  documentationUrl: "https://documentation.xapp.ai",
  feedbackEmail: "feedback@xapp.ai",
  supportEmail: "support@xapp.ai",
  auth: {
    provider: "",
    domain: "",
    clientId: "",
    audience: "",
  },
};
This file has all the information needed for the client to communicate with your custom single-tenant backend.
Accessing your new Studio
After you configured client, you can now access your instance from the Cloudfront Distribution you created earlier. A successful deployment will show you an empty Studio.
What to do next?
Deploy Failures
Deployment failures may happen. Here are a few things you need to do before you try again.
Determine Reason for Failure
You may see an error from running the script, these are typically incorrectly configured environment variables. These can be address rather quickly and the script restarted.
If you see something in your console like:
.
.
.
.
.
There was an error creating the stack.
Reason: undefined
Api released.
then the API release failed and you will need to go to the Cloudformation console and search through the events for the exact failure reason. The events are in reverse chronological order and you most likely will need to scroll down quite far to find the error.
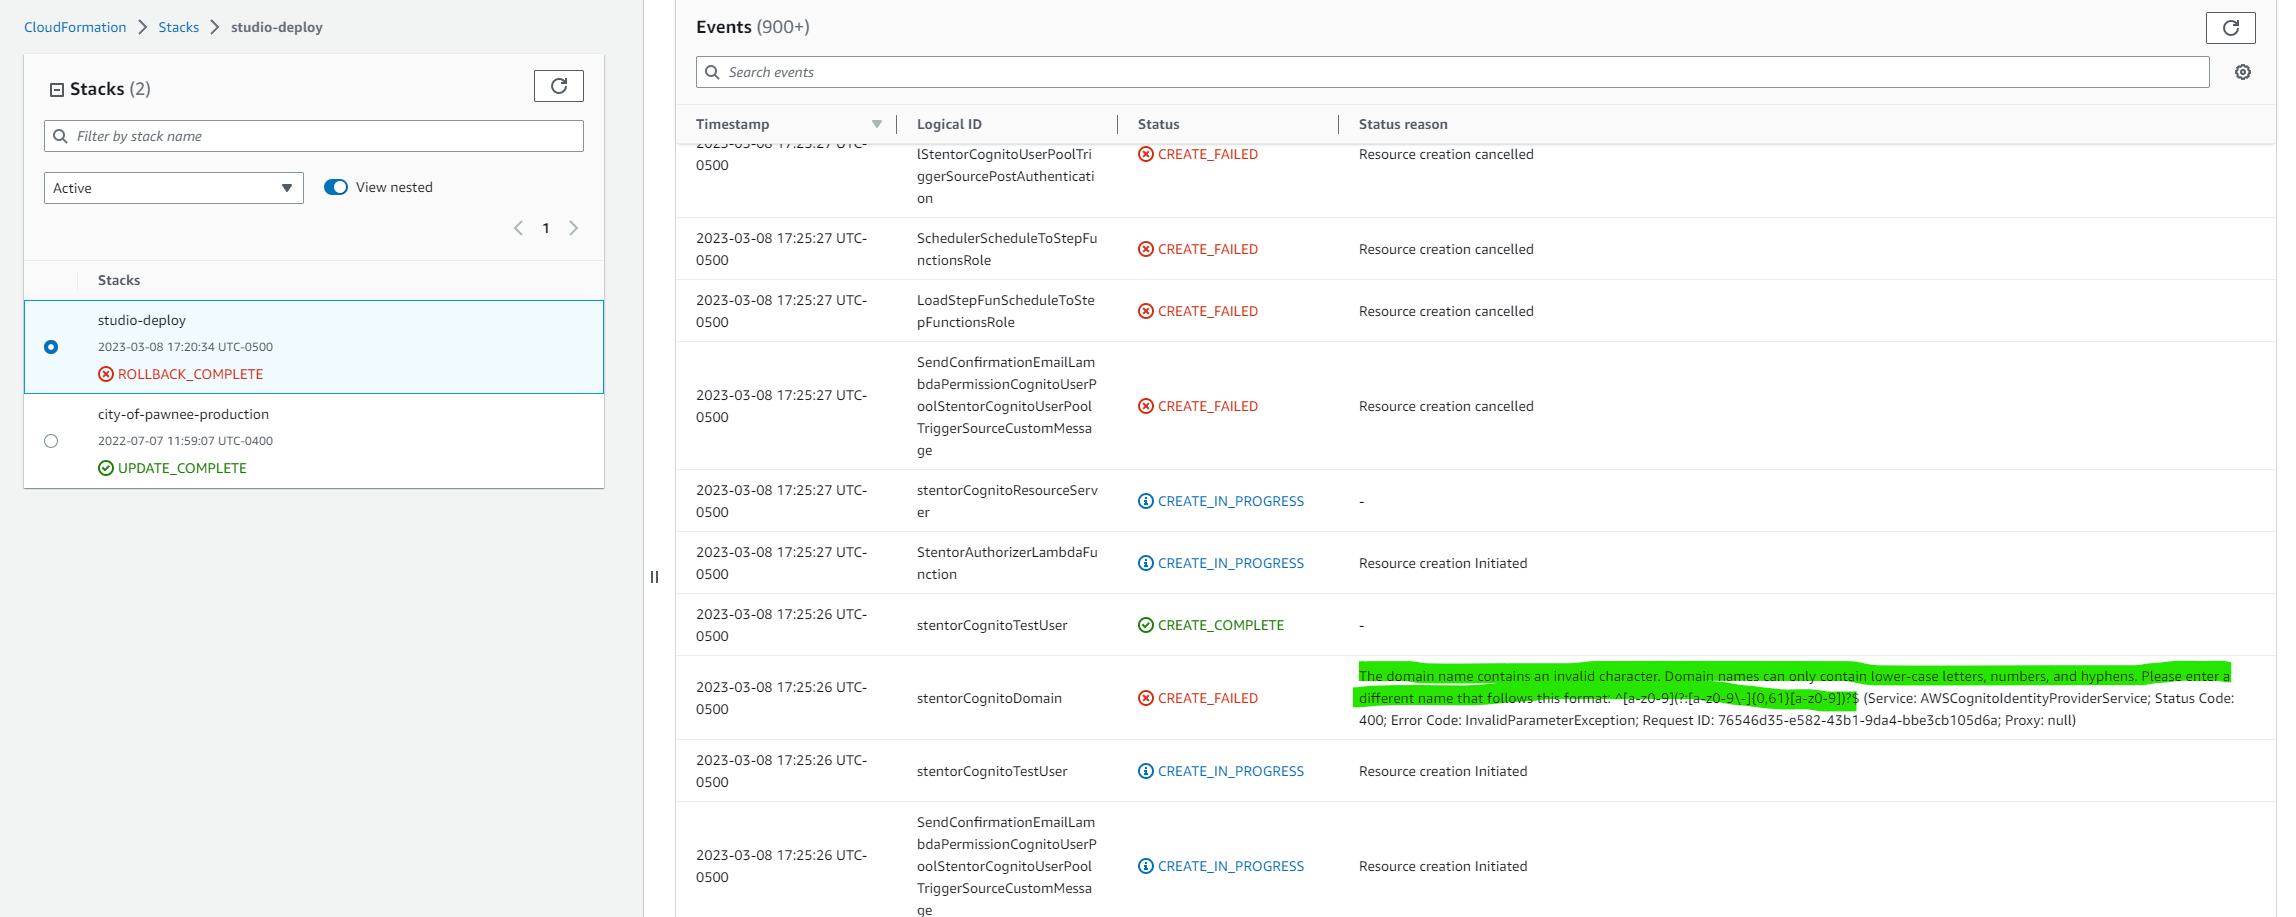
When looking through the events, look for the first CREATE_FAILED and it should have a helpful error message like in the picture above. In this case, the Cognito domain was incorrect.
Delete the Stack in Cloudformation
After the rollback is complete, go to the Cloudformation console and delete the stack. It will be named studio-deploy.
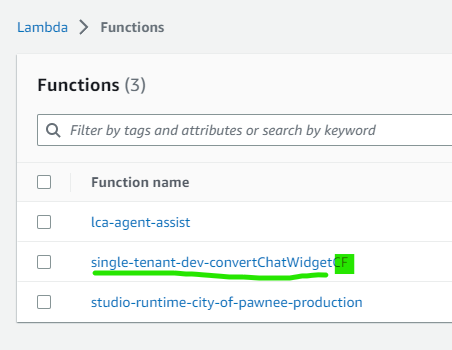
Manually Delete Lambdas
Sometimes Cloudformation doesn't clean up all the resources it started to create. In your AWS console, go to the Lambda console and look for functions ending in CF. These are created by the studio-deploy Cloudformation script. If you see any, manually delete them in the console.
Versions
By default, the client and API deploy command uses the latest available version however you can optionally specify a specific version to install.
We have different version numbers for our client & API but release them in versioning pairs that are guaranteed to work together and have compatibility. If you run a newer version of client and an older version of API, they may not work together.
You can see the available version pairs when you run:
studio-deploy list
You will then see output like this:
$ studio-deploy list

1.82.4-0.22.79
1.73.2-0.22.79
1.73.2-0.22.78
1.73.2-0.22.76


Done in 0.47s.
Each row represents {client-version}-{api-version}.
You can then deploy a specific version by using one of the versioning pairs.
studio-deploy deploy-client 1.73.2-0.22.79
This will deploy version 1.73.2 of client.
studio-deploy deploy-api 1.73.2-0.22.79
This will deploy 0.22.79 of API.
Note You must include the full version pair as the argument to the deploy commands.
You can find the release notes for each of the versions here.
Updating Existing Stack
For existing stacks, you can update client and API using the existing deploy commands.
You can find the release notes for the available releases here
Updating Client
You can update client with the same command that you used to deploy.
studio-deploy deploy-client [ver]
Once updated, we recommend to then invalidate /index.html on your CloudFront distribution to make the update appear immediately.
Updating API
You can updated API with the same command you used to deploy.
studio-deploy deploy-api [ver]
The script will upload new assets and then update the infrastructure using Cloudformation.
Development, Staging, Production
As part of onboarding, we will work closely with you getting your initial development environment setup.
We suggest separate development, staging and production environments on isolated cloud accounts as part of your deployment process.
- Development - All development and changes to the environment start in your development environment. All data within the environment is mocked data and should be considered ephemeral.
- Staging - Staging is as close to production as you can make it. Depending on your data security requirements, you can either use a copy of production data or generated mocked data. The staging environment is your final testing environment.
All of your development starts in your development environment. - Production - Production is a completely isolated environment with limited access to the backend that your customers interact with.
Flow from Development --> Staging --> Production
We believe in following infrastructure as code for reliably moving the application and it's content through the different steps of your release cycle. We will provide you with a Cloudformation script that will allow you to manage and deploy Studio to different environments. You are then responsible for developing the necessary scripts to manage the rest of your infrastructure, such as the runtime environment. For migrating your model and other content between environments, we recommend leveraging the management API to create exports of your application and then importing to the next environment.
Users & Authentication
As part of deployment, we created an Amazon Cognito user pool for you. You can keep using this user pool or you can setup third-party (federated) login (read more here).
Managing Users
You can add new users manually through the Cognito User Pool console on AWS. By default, we have self-service registration turned on, this allows users to create their own accounts however they will not have access to other organizations by default. You can turn off self-service registration within your user pool under "Sign-up experience" with disabling "Self-service sign-up".
Configuring an Admin
You most likely won't need an admin user however if you anticipate your Studio user's creating multiple organizations, an admin will have full access to all the organizations and their apps.
- Select or create a new user that will be the admin
- In the AWS Console, go to DynamoDB and select Tables on the left hand side.
- Look for a table labled
stentor-user-permission-<stage> - Click explore Table Items to see a list of all users, search until you find the user that will be admin
- Click your userId to edit the item
- Change your
globalPolicyto:"globalPolicy": {
"permissions": [
"all:read",
"all:write"
],
"roles": [
"stentor_admin"
]
}, - Click "Save Changes"
- Log out of Studio if you were logged in
- Log back in to Studio
Updating your Assistant Application for your new Studio Instance
Your assistant application, the main runtime environment, will need to point to your single-tenant instance's CMS API for retrieving content and pushing events.
Configuring the Runtime
- Update the environment variable
STUDIO_BASE_URLto your new single-tenants API URL. - Update the token in your secret's manager to a new token you generated in your new single-tenant instance.
Other Updates
- Chat Widget You will have your own hosted version of the chat widget source code that was also deployed when you deployed single tenant. You can find the new installation snippet for the widget on the channels page.
- Lex You you need to setup another Lex channel for you app in your single tenant instance since they are not brought over in an import. You can hook up to an existing Lex bot or create a new one.
- PostText You will not need to change your PostText configuration unless you either create a new app runtime or create a new Lex, you will not need to change the configuration on the PostText Lambda.
Data & Backups Databases
As part of your single-tenant deployment, you will have different types of data across a few different databases.
Read First
DynamoDB Tables
| Table | Description | Partition Key | Sort Key |
|---|---|---|---|
| App | Stores data specific to an app such as channels and base metadata | appId | |
| Org | Stores data related to an organization | organizationId | |
| Handler | Stores all handler and intent data | appId | intentId |
| Entity | Stores all entity data | entityId | appId |
| User Table | Stores user context | userId |
Backing Up
For all the tables, Point-in-time recovery (PITR) is turned on by default, which provides automatic backups of the tables. Read more about PITR.
Additional backups can be made manually if you want to store data externally.
OpenSearch
There is one major domain setup for you that holds events, suggestions, FAQs, and any crawled documents.
Backing Up
By default, OpenSearch Service will create snapshots for you automatically and store them to S3. You can also create snapshots manually.
Recommendation
The default settings when you deployed are our recommended back up settings. You can of course choose to increase the frequency of the OpenSearch automatic snapshots and even manually create more backups for storage off your AWS account.
Another recommendation is leveraging the app's export feature to create another type of backup for your app that is easier to read and then import partials if you need to. You can do this as part of your workflow for moving version updates between different environments.