Input Context
Input contexts help the NLU know which intent or intents to expect from the user based on the response that was just sent to the user. The input contexts are set on the intent and then on the response that is communicated to the user.
For example, you are asking the user for the zip code.
May I have your zip code?
Most likely, they will respond with either their zip code:
20500
Or something slightly more verbose:
my zip code is 20500
You have two intents in your model to cover the above to utterances, one is a generic number only input intent for handling all numbers and another is specific to zip codes. Unfortunately when you are testing you notice that due to some ambiguity certain zip codes are being confused as telephone numbers and in some cases the NLU thinks you are communicating a street address. To solve this, you want to leverage input context. Since you are asking for the zip, most likely the user is returning their zip code and input contexts are the way we let the NLU know we are expecting the zip code.
Since zip code can go to your number only intent and your zip code intent, you will want to set an input context on each. Since the number only intent can be used as an input for many questions, use a expecting_number input context. For the zip code intent, you can use either expecting_address or expecting_zip, it depends on the rest of your model. Then on the response for May I have your zip code? you add both contexts expecing_number and expecting_address. These are then passsed through to the NLU for you and the NLU will use them on the users next input.
NLUs will treat input context slightly different. Google Cloud Dialogflow ES for example will use it to prefer certain intents but they will always be available however on Amazon Lex intents with context will only be returned if you tell the NLU to expect it.
Input Context Parameters on Responses
In addition to the required name, such as expecting_number, you can set two parameters to let the NLU know how long to keep the context active.
turnsToLive- The number of conversation turns to keep the context alive. Minimum value of 1 and a maximum value of 20timeToLiveInSeconds- The number of seconds the context should be active after the initial
For Amazon Lex, one of the two above fields is required. On Dialogflow ES, only turnsToLive is supported.
How to Set the Input Context in Studio
First, on the intent you set an input context. The name of the context must only contain letters and underscores. We recommend prefixing with expecting_ and then the type of information you are gathering. For example:
expecting_name
or
expecting_email
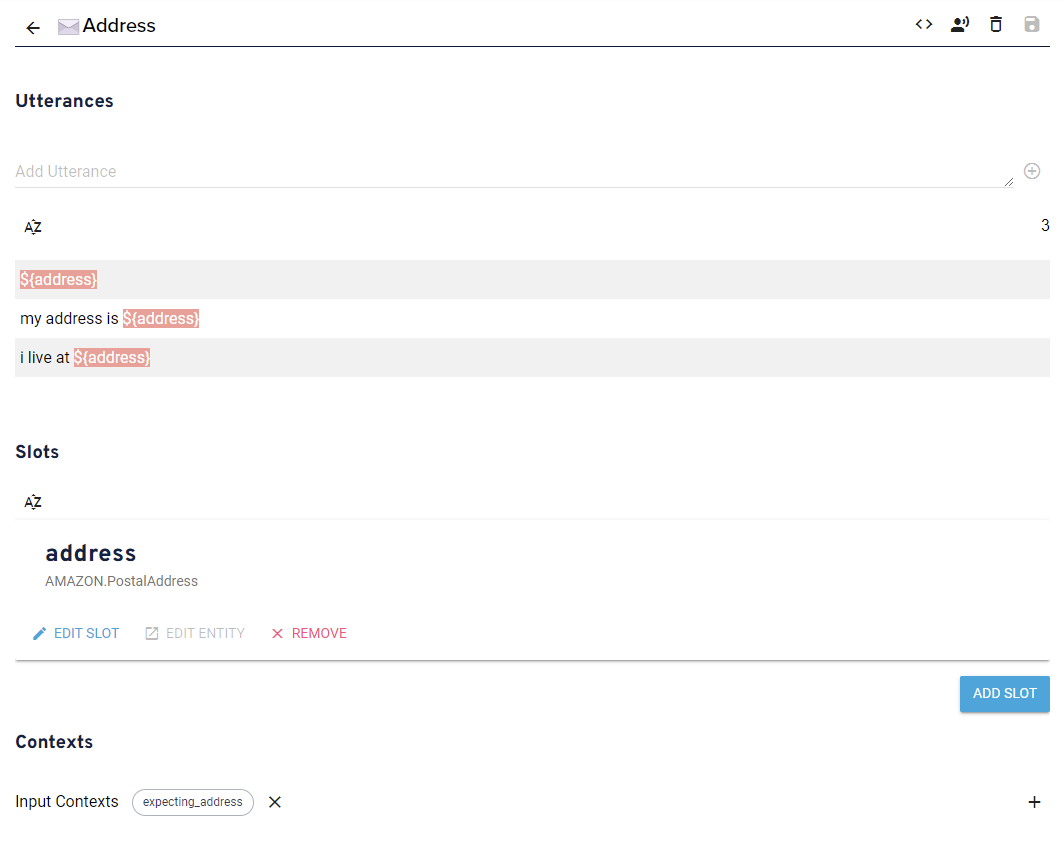
You will find the contexts at the bottom of the intent configuration view.

In the above intent, the input context of expecting_address is set.
Then, within a handler's content on your response that asks the user for their address.

Click the + button next to the "Add Reprompt" button and select "Active Contexts". Make sure this matches exactly with what you added to the intent.
By default, Studio will set the turnsToLive to be 2 and the timeToLiveInSeconds to be 400. These can be modified by editing the JSON on the handler's response.
How to Set the Input Context in Stentor SDK
The response builder class has a method, withActiveContext that allows you to set the context:
const response = new ResponseBuilder({ device })
    .say("May I have your zip code?")
    .withActiveContext({ name: "expecting_zip", timeToLive: { turnsToLive: 1 } })
    .build();
You can set multiple contexts by calling the method multiple times:
const response = new ResponseBuilder({ device })
    .say("May I have your zip code?")
    .withActiveContext({ name: "expecting_zip", timeToLive: { turnsToLive: 1 } })
    .withActiveContext({ name: "expecting_number", timeToLive: { turnsToLive: 1 } })
    .build();
You can also leverage timeToLiveInSeconds:
const response = new ResponseBuilder({ device })
    .say("May I have your zip code?")
    .withActiveContext({ name: "expecting_zip", timeToLive: { timeToLiveInSeconds: 30 } })
    .build();