AWS Lex (V2) Channel
Overview
The AWS Lex channel provides you two options for integration; either with fulfillment where all requests first go through Lex or as a pure NLU without fulfillment defined in Lex and instead Lex is called from within Stentor.
Requirements
- AWS Account and user with appropriate permissions to:
- To create a Lex Bot
- To create IAM Roles
Setup
This is a new channel currently in beta and is subject to change. You will need to enable it in your app's settings to access it on the "Add Channel" dialog.
Create a Lex V2 Bot (optional)
- In your AWS console, create a Lex V2 bot
- Select "Create a blank bot"
- Add a name, we recommend the appId of your application in Studio
- Select "Create a role with basic Amazon Lex Permissions"
- Take note of the ID of your newly created bot
- You will add it to the policy we create below
- Delete the first intent that is created for you automatically.
Create Lex V2 Channel
- In Studio within your application, select Publish --> Channels
- Click the + button in the Channels header
- Select "Amazon Lex V2"
- Note: If you don't see this option, you may need to first enable this channel in your app's settings
Create IAM Policy for Studio Management
-
Create IAM Policy
-
Click JSON tab and copy paste the following after you made the following replacements:
region- Onlyus-east-1is supported at this time.account- Your AWS account numberbot-id- The ID of the bot you made earlierbot-alias- OnlyTSTALIASIDis supported at this time, this is the default alias for the latest version.name-of-management-role- Decide now what you management role will be, we reccomendstudio-{appId}-lex-management- NOTE You will use this in the next step, it will need to match exactly
{
    "Version": "2012-10-17",
    "Statement": [
        {
            "Effect": "Allow",
            "Action": [
                "iam:PassRole"
            ],
            "Resource": "arn:aws:iam::<account>:role/<name-of-management-role>"
        },
        {
            "Effect": "Allow",
            "Action": [
                "lex:Build*",
                "lex:Create*",
                "lex:Delete*",
                "lex:Describe*",
                "lex:Get*",
                "lex:List*",
                "lex:Put*",
                "lex:Recognize*",
                "lex:Search*",
                "lex:Start*",
                "lex:Stop*",
                "lex:Tag*",
                "lex:Update*",
                "lex:Untag*"
            ],
            "Resource": [
                "arn:aws:lex:<region>:<account>:bot/<bot-id>",
                "arn:aws:lex:<region>:<account>:bot-alias/<bot-id>/<bot-alias-id>"
            ]
        },
        {
            "Effect": "Allow",
            "Action": [
                "lex:CreateUploadUrl",
                "lex:ListBuiltInSlotTypes",
                "lex:ListBots",
                "lex:ListBuiltInIntents",
                "lex:ListImports",
                "lex:ListExports"
            ],
            "Resource": "*"
        }
    ]
} -
Add optional tags for your own tracking
-
Name and save the policy.
- For the policy name we recommend
studio-{appId}-lex-management-policyor similar.
- For the policy name we recommend
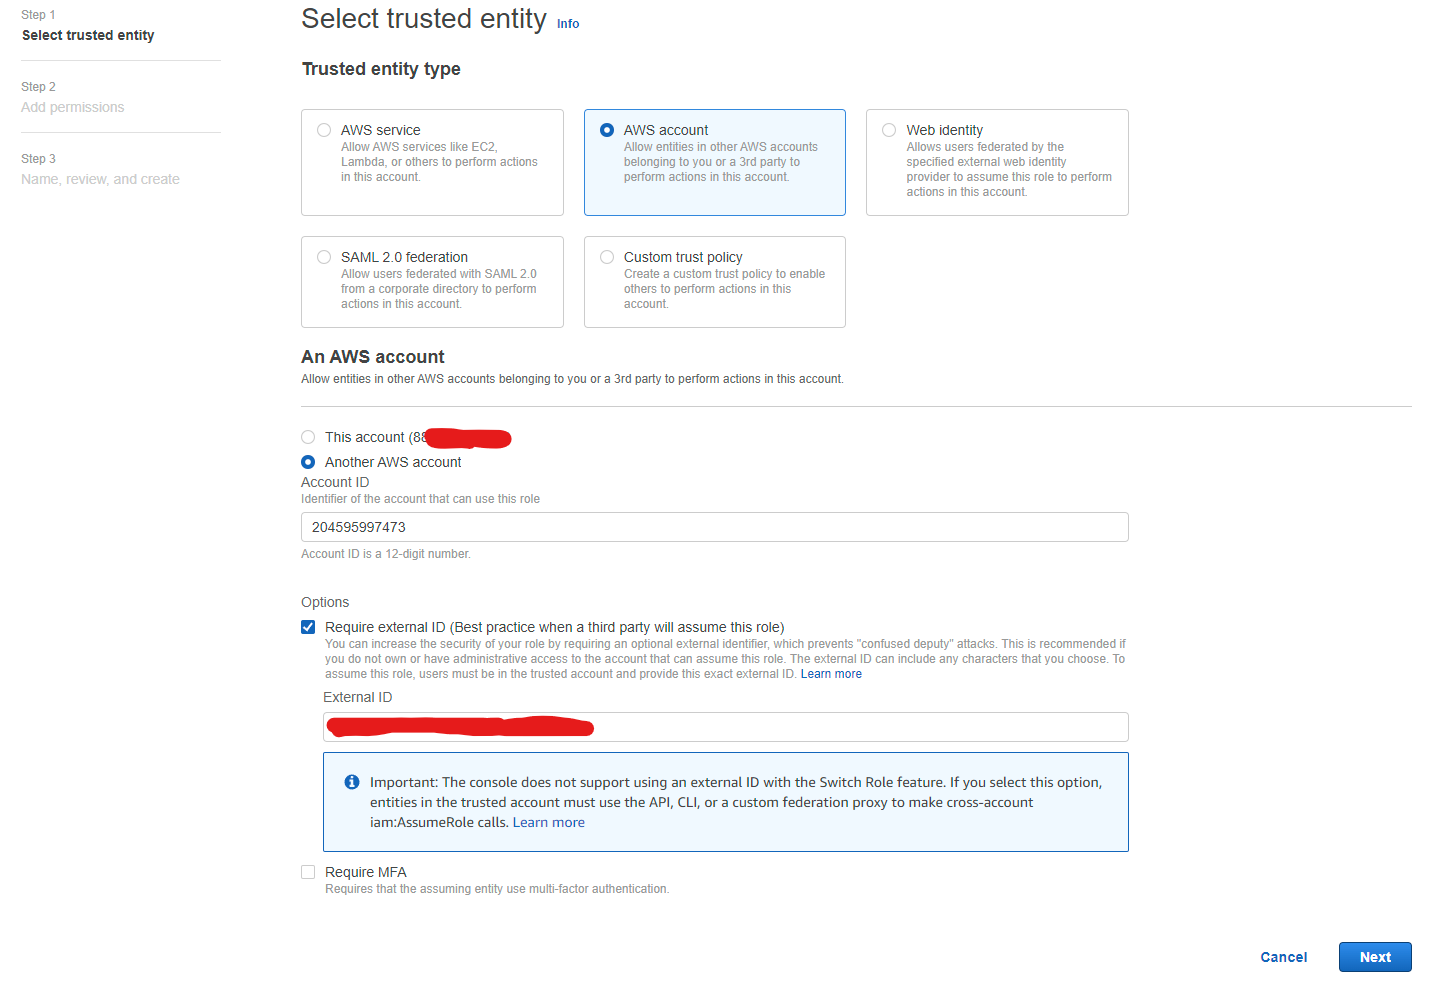
Create an IAM Role for Studio Management
-
Create IAM Role
-
Select AWS account
-
Select 'Another AWS account', select 'Another AWS account' radio button and enter account ID:
204595997473- If you are running a single tenant version, this will be the account number where your Studio instance is deployed. Keep the default value.
-
Check 'Require external ID', paste in the external ID from your newly created Lex channel under setting "Management Role External ID"
-
Back in the AWS Console, click "Next"
- Search for you policy you created above and select it, click "Next"
- Use the exact same role name you added to the policy in the previous step
- For role name we recommend
studio-{appId}-lex-management
- For role name we recommend
- When you create it, click
View Rolein the green banner at the top. - Copy the role's ARN and paste it to the channel in Studio that you created earlier under "Management Role"
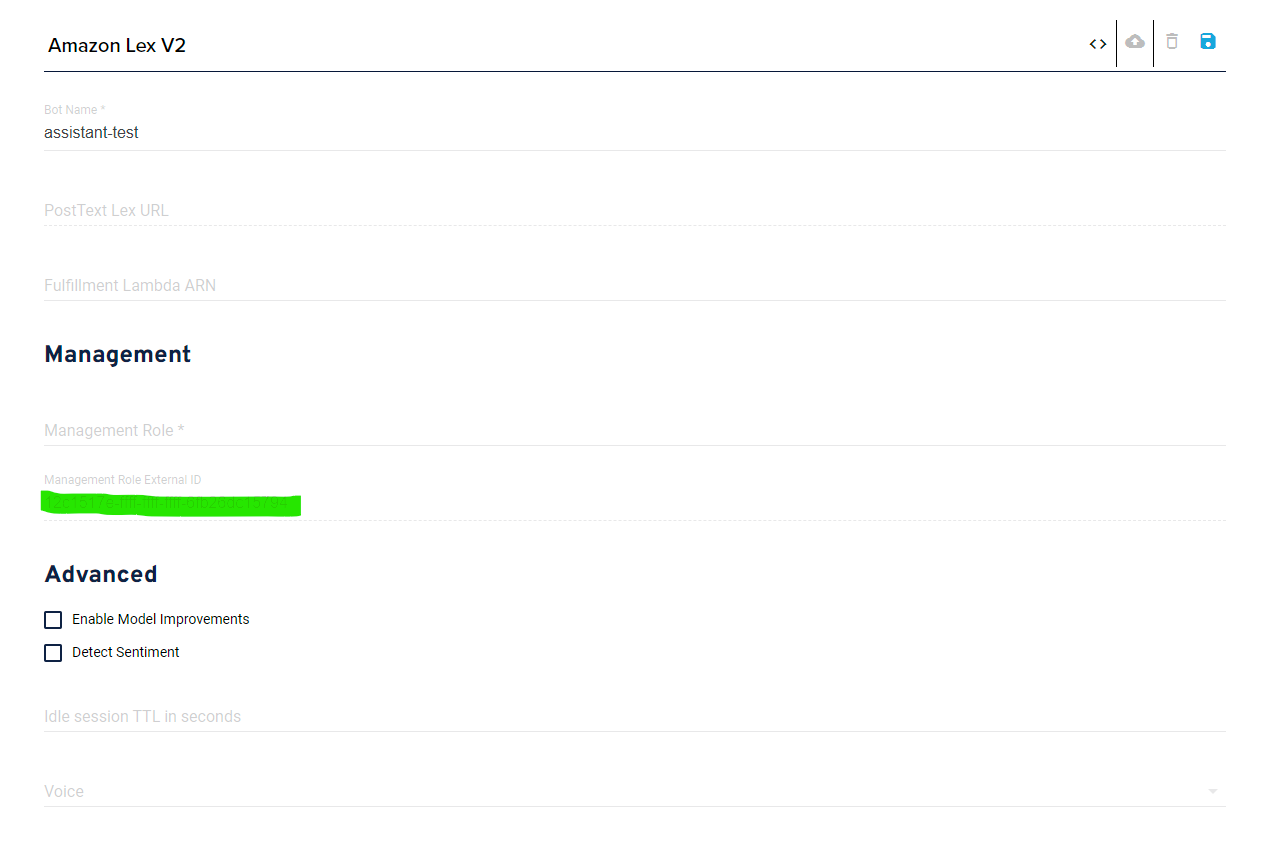
Configuration
Bot Name
The name of the bot you will be managing with Studio. This is not the ID but is the name.
PostText Lex URL
The PostFix URL is generated for you automatically when you leverage the provided CloudFormation script for deployment. It is a lambda exposed through API Gateway that calls your Lex bot's PostText API. The PostText is part of the Lex Runtime Service that receives user input and returns the bot's response. The PostText URL takes Stentor requests and then returns Stentor responses.
Read More
Fulfillment Lambda ARN
Optional, if you provide this it will set it as the fulfillment ARN for each intent. It will then be called whenever an intent is resolved. This is required when you use Lex as a channel.
Read More
Management Role
The role, as described above in configuration, this is the ARN for the IAM Role you setup to allow management by Studio.
Management Role External ID
Readonly, use this when setting up your management role. It helps further secure the connection betwen AWS accounts.
Installation
This is only required if you have your own runtime environment.
You can use your new Lex V2 bot as a stand alone NLU, use it as a channel or both methods at the same time. When you use it as a channel, you must provide a fulfillment ARN to the channel. This lets Lex know what Lambda to call for responses.
Use as an NLU
You can use Lex as a stand-alone NLU for channels that require one, such as the chat widget channel.
Add the Lex service to your project:
npm i @xapp/stentor-service-lex --production
Then within your app:
import { LexServiceV2 } from "@xapp/stentor-service-lex";

// ... a few lines of code later

const nlu = new LexServiceV2({
    botId: process.env.LEX_BOT_ID,
    botAliasId: process.env.LEX_BOT_ALIAS_ID
});

// ... a few more lines of code later

        .withChannels([
            Stentor(nlu)
        ])
Use as a Channel
If you want to leverage Lex V2 as a channel, you must provide the Lambda ARN where the following code resides.
Add the channel to your project:
npm i @xapp/stentor-lex-v2 --production
Then import and integrate:
import { LexV2Channel } from "@xapp/stentor-lex-v2";

// ... a few lines of code later

    const assistant = new Assistant()

        .withUserStorage(new DynamoUserStorage())
        .withHandlers({
            // Add pre-built handlers or make custom ones!
            ContactCaptureHandler: ContactCaptureHandler,
            QuestionAnsweringHandler: QuestionAnsweringHandler
        })
        .withChannels([
            // ADD LexV2Channel here!
            LexV2Channel(),
            Stentor(nlu)
        ])
        .lambda();